OpenSILEX PHIS Deployment
Introduction
This document explains you how to deploy OpenSILEX PHIS on your personnal computer.
In this document, commands are for Ubuntu 16.04. However, the majority of these commands are compatible with all Debian distributions which have the package manager Aptitude.
1. Prerequisite
Hardware
We strongly recommend a server or virtual machines on a compute cloud with :
- Processor: recommended 4 CPU 2.30GHz
- Ethernet connection
- Hard Drive: minimum 500 Go, depending on your data volume.
- Memory (RAM): recommended 32 GB or above
Software
MongoDB and Robo 3T
MongoDB
All the information needed to install MongoDB is available at docs.mongodb.com.
The new OpenSILEX release (v3.0) requires at least MongoDB v4.0, which could already be used for the previous release (v2.6). The following links describe how to install or upgrade MongoDB for Ubuntu and Debian systems:
-
In case of a new installation, please follow: Install MongoDB 4.0
-
In case of an upgrade of a previously installed MongoDB version, please follow: Upgrade MongoDB from 3.4 to 4.0
You can check your current MongoDB version with:
mongod --version
Now you have a Mongodb service.
Now MongoDB is installed.
Note 1
The path to the database can be changed in the etc/mongod.conf file.
Open the mongod.conf configuration file with any text editor, for instance with gedit: sudo gedit /etc/mongod.conf.
You’ll see what is the path to the Mongo database (in my case it is /var/lib/mongodb):
# Where and how to store data.
storage:
  dbPath: /var/lib/mongodb
Set mongodb as owner of the MongoDB files, replacing <dbPath> by the path displayed after dbPath:
sudo chown -R mongodb:mongodb <dbPath>
Note 2
In /etc/mongod.conf file, you should add line: fork: true after
# how the process runs
processManagement:*
as follows :
# how the process runs
processManagement:*
  fork: true
This line is not an obligation, in default mode MongoDB runs as fork (i.e. as a deamon) but it is preffered to force it by fork: true to be sure.
Every time you change the mongod.conf file, you need to restart the mongod service:
sudo systemctl restart mongod
In this document, we use default folder var/lib/mongodb
To run MongoDB, use following command line:
sudo mongod --config /etc/mongod.conf
Robo 3T
Download Robo 3T at robomongo.org.
Extract the downloaded archive (replace <version> with your version of Robot3t):
tar -xvf ~/Downloads/robo3t<version> .tar.gz <Robo 3T repository location>
Go to Robo 3T repository location:
cd <Robo 3T repository location>
Run the installation program:
./robo3t<version> /bin/robo3t
PostgreSQL and PostGIS
PostgreSQL and PostGIS installation
PostgreSQL Installation
In a terminal, run these commands:
 sudo apt-get update
 sudo apt-get install postgresql
 sudo apt-get install postgresql-9.5-postgis-2.2
Locate the PostgreSQL client with:
which psql
PostgreSQL configuration
The configuration files are in the etc/postgresql/9.5/main folder.
To change the port of the service, edit the postgresql.conf file:
nano /etc/postgresql/9.5/main/postgresql.conf
In the Connection and Authentication section, replace port = XXXX by port = 5432.
Then restart the service to take the changes into account:
sudo systemctl restart postgresql
Netbeans and JDK
Jdk
You can check if Java Development Kit has already been installed (and with which version) from a terminal:
java -version
If JDK is already installed you can go to the next section, Netbeans.
Otherwise, download the JDK 8 sources (e.g. tar.gz archive) at oracle.com.
Create a JDK folder wherever you want. For example:
mkdir ~/jdk
In the created folder, extract the archive with this command:
tar -xvf ~/Downloads/jdk-X.X.X_linux-x64_bin.tar.gz ~/jdk/
Once the installation has been completed, make sure that the value of the property netbeans_jdkhome of the file ~/netbeans-X.X/etc/netbeans.conf is "/usr/lib/jvm/java-8-openjdk-amd64".
Netbeans
The documentation needed to install Netbeans is available at netbeans.org. Download the full version of Netbeans at netbeans.org/downloads.
Run the downloaded script:
sh ~/Downloads/netbeans-X.X-linux.sh
Follow the installation steps.
Check that the PHP and Glassfish/JEE modules are installed from the Netbeans Tools > Plugins menu.
Choose your installation folder for Netbeans (here ~/netbeans) and select the JDK installation folder (in our case ~/jdk).
You can launch Netbeans from its installation folder by executing the netbeans file (in the bin directory):
./bin/netbeans
PHP
Install PHP 7.0 executing the following commands:
sudo apt-get update
sudo apt-get install php php-mbstring php-dom
Check your PHP version from a terminal:
php --version
OpenSILEX does currently not support PHP 7.2. Developments are being made to provide this compatibility.
Apache Tomcat and RDF4J
Apache Tomcat installation
To have a better control on the installation of Tomcat, install Tomcat from sources files (e.g. tar.gz archive).
You can download Tomcat9.0 archive, core distribution, at tomcat.apache.org.
Create an installation folder for Tomcat. We advise you to create the Tomcat folder in /home (or /home/
sudo mkdir /home/tomcat
Extract the archive in this folder (replace <user> by your user and <version> by the version you downloaded):
cd /home/tomcat/
tar --owner=<user> -xvzf ~/Downloads/apache-tomcat<version>.tar.gz
To be consistent with the OpenSILEX PHIS documentation, we recommand you to rename the Apache Tomcat folder so that the version does not appear :
mv apache-tomcat<version> apache-tomcat
With this procedure, Tomcat is not recognized by Ubuntu services control (systemctl or services). So you need to execute scripts which are in Tomcat bin folder (e.g: startup.sh to run and shutdown.sh to stop). You also need to change rights on files.
Apache Tomcat configuration
Tomcat configuration files are located in the /home/tomcat/apache-tomcat/conf folder.
To use Tomcat manager page you need to define an admin user.
To do that edit the tomcat-users file:
nano /home/tomcat/apache-tomcat/conf/tomcat-users.xml
and add lines:
  <role rolename="manager"/>
  <role rolename="manager-gui"/>
  <user username="tomcat-admin" password="azerty" roles="manager, manager-script, manager-gui"/>
As stated in the file tomcat-users.xml, “do not forget to remove the <!.. ..> [around the role entries]”.
To configure port, edit server.xml:
nano /home/tomcat/apache-tomcat/conf/server.xml
and replace:
<Connector port="XXXX" protocol="HTTP/1.1"
              connectionTimeout="20000"
              redirectPort="8443" />
by:
<Connector port="8080" protocol="HTTP/1.1"
              connectionTimeout="20000"
              redirectPort="8443" />
You have to allow encoded slash in /home/tomcat/apache-tomcat/conf/catalina.properties. If you have the line org.apache.tomcat.util.buf.UDecoder.ALLOW_ENCODED_SLASH=false, change false value by true.
If you don’t have this line, add org.apache.tomcat.util.buf.UDecoder.ALLOW_ENCODED_SLASH=true at the end of file.
Start the service:
/home/tomcat/apache-tomcat/bin/startup.sh
RDF4J
Download archive zip file rdf4j.org and extract it (replace <version> by the version downloaded):
unzip ~/Downloads/eclipse-rdf4j-<version>-sdk.zip -d ~/
You can already copy .war files to the Tomcat webapps folder:
cp ~/eclipse-rdf4j-<version>/war/* /home/tomcat/apache-tomcat/webapps/
Apache2
Apache Installation
sudo apt-get update
sudo apt-get install apache2 libapache2-mod-php7.0
Apache Configuration
With this installation configuration files are in /etc/apache2 folder.
To change the port you need to edit the file port.conf:
sudo nano /etc/apache2/ports.conf
change line LISTEN XX to LISTEN 80.
Restart service apache2:
sudo systemctl restart apache2
Composer
Sometimes when installing Composer from the Ubuntu package, it does not run correctly. To avoid any problem, you should install Composer from the Composer installer file via the following command line (Curl must be already installed):
sudo curl -sS https://getcomposer.org/installer | sudo php -- --install-dir=/usr/local/bin --filename=composer
Maybe you should create a symbolic link between the new version of composer in /usr/bin or use the complete command. e.g. php /usr/local/bin/composer.
Now install the plugin that you need to use Composer:
sudo composer global require "fxp/composer-asset-plugin:^1.2.0"
Git
Git is needed to download the OpenSILEX PHIS’s web service and web application. Git is already installed on most Linux native installations but if it is not your case, you can install it as follows:
sudo apt-get install git
Go to the Using Git section of this documentation to check how OpenSILEX developpers use Git.
Check install
Check the configuration of Apache2, Tomcat and PostgreSQL servers (nmap must be intalled, if it is not, do not install it because it is only used for checking ports.):
sudo systemctl start apache2
sudo systemctl start postgresql
/home/tomcat/apache-tomcat/bin/startup
nmap 127.0.0.1
The answer should be:
PORT     STATE SERVICE
80/tcp   open  http
5432/tcp open  postgresql
8080/tcp open  http-proxy
For information:
httpis your Apache2 serverpostgresqlis your PostgreSQL serverhttp-proxyis your Tomcat server
They are the three services that you need so if the previous command’s result is correct, you can continue to the next section Prerequisite Files.
Otherwise you have two options:
- remember the differences and ajust for the next steps
- return to the related section (Tomcat, Apache2, PostgreSQL)
Note
If you didn’t install the programs exactly like in this document, it is possible that configuration files aren’t located exactly like us.
Files
I recommand you to create a folder where you will download all the required files:
mkdir ~/OpenSILEX
Web service folder
Get source from GitHub, directly from the phis-ws development repository:
cd ~/OpenSILEX
git clone https://github.com/OpenSILEX/phis-ws.git
Preferably, get the source from the last release at phis-ws/releases (for example, use git clone --branch 3.0 https://github.com/OpenSILEX/phis-ws.git if you want to install the release 3.0).
Web application folder
Get source from GitHub, directly from the phis-webapp development repository:
cd ~/OpenSILEX
git clone https://github.com/OpenSILEX/phis-webapp.git
Preferably, get the source from the last release at phis-webapp/releases (for example, use git clone --branch 3.0 https://github.com/OpenSILEX/phis-webapp.git if you want to install the release 3.0).
Ontology files
Get the source from GitHub, directly from the ontology-vocabularies development repository:
cd ~/OpenSILEX
git clone https://github.com/OpenSILEX/ontology-vocabularies.git
Preferably, get the source from the last release at ontology-vocabularies/releases (for example, use git clone --branch 3.0 https://github.com/OpenSILEX/ontology-vocabularies.git if you want to install the release 3.0).
Database file
Download the database dump file opensilex_st_dump.sql.
2. OpenSILEX PHIS Installation
MongoDB database
You only create a connection to a collection. Run MongoDB:
sudo mongod --config /etc/mongod.conf
Run Robo 3T:
~/robo3t/bin/robo3t
Create a connection:
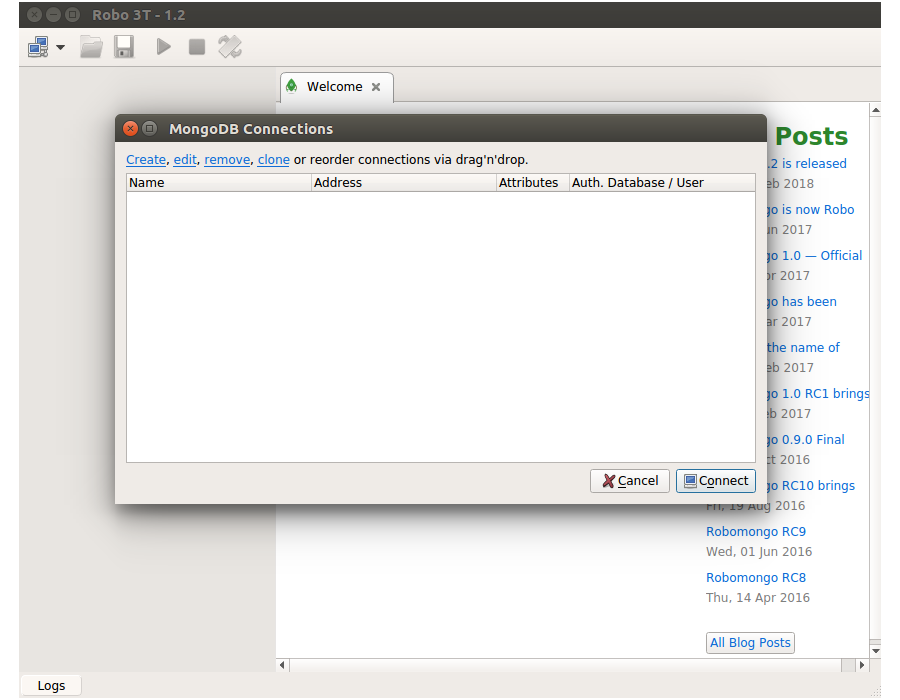
Configure your connection:

Create your database:
Right click on connection name -> Create Database -> enter a name (phis in this document).
RDF4J Ontologies
Go to http://localhost:8080/. You are in Tomcat server home page.
Click on Manager App, connect with your Tomcat user (a default user is configured in the home/tomcat/apache-tomcat/tomcat-users.xml configuration file).
Search rdf4j-workbench in the list, if isn’t running, click on Start)
Click on the rdf4j-workbench link.
Click New repository and complete as in the picture:
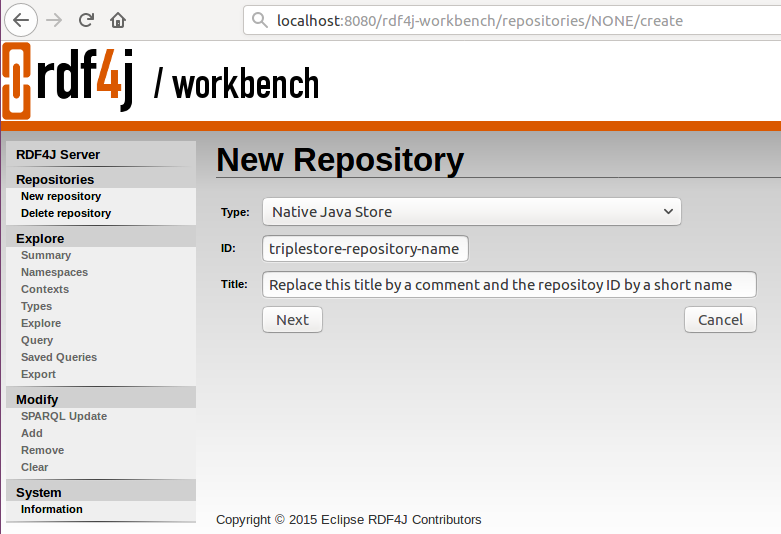
Click Next and check if is corresponds to this:
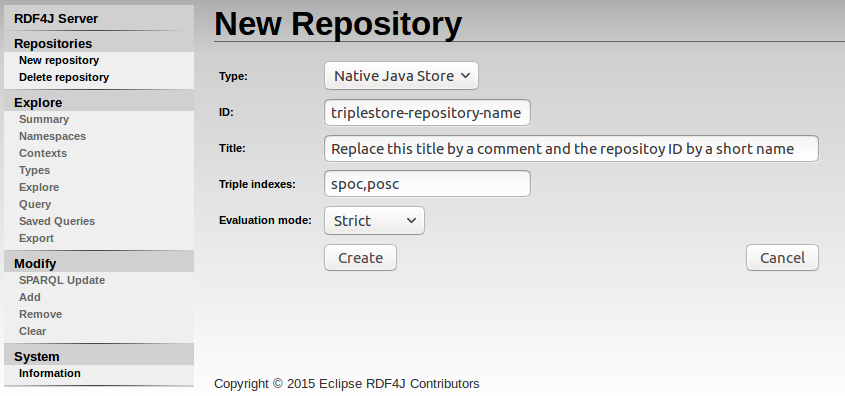
Click Create.
You will do these steps many times:
Now, Click Add in the Modify submenu.
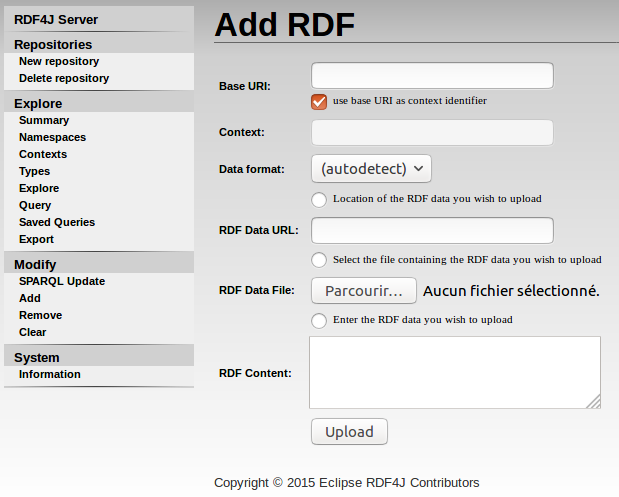
Click on the button next to RDF Data File in order to select a RDF Data File.
Select the oeso.owl file downloaded previously from the GitHub repository ontology-vocabularies.
Add it in the context <http://www.opensilex.org/vocabulary/oeso> with base URI and context fields (check the box “use base URI as context identifier”).
Fill the field Base URI with a value of the form <base-url-of-your domain>/vocabularies/oeso. For example, the development team in Montpellier uses the base URI http://www.opensilex.org/vocabularies/oeso. Please use another one if your install your own version of OpenSILEX, for instance https://www.<your-institution-name>/vocabularies/oeso.
In the Data format field, select RDF/XML and then click on Upload.
Repeat this operation with the oeev.owl file downloaded previously from the GitHub repository ontology-vocabularies, with the Base URI (and context) of the form <base-url-of-your domain>/vocabularies/oeev.
Add also a new context for the Ontology Annotation (with the RDF Data File oa.rdf downloadable here and with the Base URI value http://www.w3.org/ns/oa.
PostgreSQL database
Connect to Postgre:
sudo -i -u postgres
Create the opensilex user
Start the SQL editor:
psql
Run the following commands:
CREATE USER opensilex;
ALTER ROLE opensilex WITH CREATEDB;
ALTER ROLE opensilex WITH SUPERUSER;
ALTER USER opensilex WITH ENCRYPTED PASSWORD 'azerty';
Create the database
We recommand to name the PostgreSQL database with your experimental installation’s name. Create the PostgreSQL database with the following command:
CREATE DATABASE <experimental_installation_name> OWNER opensilex;
Exit the SQL connection:
\q
Create the PostGIS extension
Connect to the database with the opensilex user:
psql -U opensilex -h 127.0.0.1 -d <experimental_installation_name>
and enter opensilex’s current password azerty when asked.
Finally run these commands to create the extension:
CREATE EXTENSION postgis;
select postgis_full_version();
If you have an error connecting to the phis user (+ FATAL: authentification peer:), see Errors with PostgreSQL in the error section.
Exit the SQL editor:
\q
Set up the database
Download the template dump file from this documentation opensilex_st_dump.sql (make sure you download it in a folder where you are fully owner - like the /var/lib/postgresql/ folder - because of PosgreSQL ownership issue when importing data).
Import data with :
psql -U opensilex -h 127.0.0.1 <experimental_installation_name> < /var/lib/postgresql/opensilex_st_dump.sql
With specific access rights, you can get a dump from the demonstration version:
# from postres server
pg_dump -O -U opensilex <experimental_installation_name> > opensilex_st_dump.sql
# -O : --no-owner
# -s : only schema
# -h <IP> : postgres host
# -U <user> : user
If you need to generate a MD5 password, you can use:
echo -n bonjour | md5sum
Initialising Users
To start using or trying OpenSILEX PHIS, two users are created automatically:
- admin@opensilex.org/admin for administrative rights
- guest@opensilex.org/guest for restricted rights See OpenSILEX PHIS user documentation for further explanation on users management and how to add new users. We recommand you to change the admin password.
Check the OpenSILEX PHIS user documentation for more informations about users (eg. adding other users).
Web Service
To deploy a web service with Tomcat, you need a war file.
To generate a war file from a project, the easiest solution is to use Netbeans.
Folders
Create directories for images and layers:
mkdir -p ~/opensilex-ws/documents/instance
sudo mkdir /var/www/html/images
sudo mkdir /var/www/html/layers
sudo chown -R <user>:<user> /var/www/html/images
sudo chown -R <user>:<user> /var/www/html/layers
sudo chown -R <user>:<user> ~/opensilex-ws/documents/
sudo chmod -R 775 /var/www/html/images
sudo chmod -R 775 /var/www/html/layers
sudo chmod -R 775 ~/opensilex-ws/documents/
Open project
Run netbeans:
~/netbeans/bin/netbeans
Note
Netbeans frequently meets error when he starts. If you have an error please go to the common error section.
Make sure that you have correctly installed Netbeans and linked it to java (see the Netbeans and JDK section above).
When Netbeans starts, open the phis2-ws project located in the phis-ws GitHub project.
If problems are detected in the project: click right on the project name -> Resolve problems -> Resolve.
If problems can’t be resolved like that please go to the common error section.
Configuration Files
You don’t need to edit your configuration files specifically with netbeans, you can use a classical text editor (nano, vim, gedit…) to edit them.
Maven profiles are used to generate war files with different configurations.
Three profiles exists by default:
dev(default): Profile used for local developpement with default valuestest: Profile used for testing purpose with no values by defaultprod: Profile used for production with no values by default
Specific profile configurations are defined in the config.properties file which is located in phis2-ws/src/main/<profile name>/.
Netbeans users: configuration files are located in ~/OpenSILEX/phis-ws/phis2-ws/src/main/profiles {profile name}.
Profile could be used with the following command line (-P option) from a terminal opened at ~/OpenSILEX/phis-ws/phis2-ws :
mvn install -Ptest
With no -P option, dev profile is used.
Note
If you use netbeans to deploy war file in the Tomcat server, the default port is 8084 but in this document we choose to deploy ourselves our war files so the port need to be the Tomcat service port 8080.
The choice of deploying ourselves our war files is justified by the universality of the procedure. Netbeans is heavy and some pc can have difficulty to run it and other softwares at the same time.
Using Netbeans enables you to deploy more quickly.
Warning
Every time you use the localhost address, you need to use the IP address 127.0.0.1 and not the name localhost.
Edit the file config.properties of the dev profile (you have to adapt values between < >).
You need to change the port with the value chosen for Tomcat (in our case 8080):
# MongoDB configuration
mongo.host=127.0.0.1
mongo.port=27017
mongo.db=<experimental_installation_name>
mongo.user=opensilex
mongo.password=azerty
mongo.authdb=opensilex

# PostgreSQL configuration
pg.host=127.0.0.1
pg.port=5432
pg.db=<experimental_installation_name>
pg.user=opensilex
pg.password=azerty

# RDF4J Configuration
rdf.host=127.0.0.1
rdf.port=8080
rdf.path=rdf4j-server
rdf.infra=opensilex
rdf.repo=opensilex

# Webservice configuration
ws.log.dir=/home/tomcat/apache-tomcat/logs/opensilex-ws

ws.host=127.0.0.1
ws.port=8080
ws.target=phis2ws
ws.baseUrl=rest

ws.doc.host=127.0.0.1
ws.doc.port=8080
ws.doc.name=phis2ws

ws.updir.host=127.0.0.1
ws.updir.user=<Linux session name>
ws.updir.password=<Linux session password>
ws.updir.doc=~/opensilex/documents/instance

ws.images.dir=/var/www/html/images
ws.images.url=http://127.0.0.1/images

ws.layers.dir=/var/www/html/layers
ws.layers.url=http://127.0.0.1/layers
Generate WAR file
When all configuration files are correctly set up you can generate the .war file: right click on the project’s name -> Build with depedencies.
The .war file is generated in <phis-ws git repository>/phis2-ws/target/phis2ws.war.
Every time you will change source files, such as the configuration file, you will need to generate and deploy once again the .war file.
Deploy war file
Copy the WAR archive into the Tomcat webapps folder (replace <> with the right phis-ws git repository and the Tomcat version):
cp <phis-ws git repository>/target/phis2ws.war /home/tomcat/apache-tomcat/webapps/phis2ws.war
Check web service
Your web service is directly deployed. You can check that at http://127.0.0.1:8080/ (it is necessary not to use localhost).
On the Tomcat server home page, click on Manager App and connect with the Tomcat user.
Search phis2ws in the list (if it isn’t running, click on Start) and click on the name /phis2ws.
You are now on your web service! if it is correctly set up, you have 2 operationnal links.
Note </br> You can directly go on the web service with the URL http://127.0.0.1:8080/phis2ws
To check if you have correctly set up your web service :
- Click on the
Documentation link - Find the line
brapiv1tokenand click on it - Click on
POST - Click on the example field
- Click on the
Try it out!button
The Response Code you get should be:
201
Otherwise, please go to the common error section.
Web application
Folder
The web application deployment is done by Apache2. You have to copy the webapp folder (downloaded from OpenSILEX/phis-webapp) in the Apache root folder (in our case /var/www/html).
sudo cp -r <Git folder>/phis-webapp /var/www/html
Change the permissions of this folder:
sudo chown -R <username>:www-data /var/www/html/phis-webapp
sudo chmod 775 -R /var/www/html/phis-webapp
Note</br>
www-data is the default Apache2 username. But in rare case it can be different. You can check the value of APACHE_RUN_USER it in the /etc/apache2/envvars file to be sure.
Configuration
To deploy the web application in localhost, it isn’t necessary to open it with Netbeans:
- Edit
/var/www/html/phis-webapp/config/web_services.php - Set the value of
WS_PHIS_PATH_DOCtohttp://127.0.0.1:8080/phis2ws
To deploy in localhost it isn’t necessary to open webapp with netbeans , you only need adapt configuration files so you can use classical editor.
Netbeans users:
Open the webapp folder with netbeans, like a php project.
open project -> /var/www/html/phis-webapp -> open
Configuration files are in: phis-webapp -> Source files -> config
Other users:
Configuration files are in: /var/www/html/phis-webapp/config
Edit:
- web_services.php
Adapt the last lines with the correct URL in our case with:define('WS_PHIS_PATH', 'http://localhost:8080/phis2ws/rest/'); define('WS_PHIS_PATH_DOC', 'http://localhost:8080/phis2ws');
If you are all exactly doing like in this document, it’s the only configuration file you need to change. But you can check other configuration files: compare paths and URL with information written in web services configuration files.
Composer
Go to your webapp folder:
cd /var/www/html/phis-webapp
Run composer update:
composer update --ignore-platform-reqs
It takes some time.
It may end in error telling that a PHP package is missing. In this case, install this package:
sudo apt-get install php-<name of the package given by composer>
Re-run composer update. It may end again in error like previously.
Repeat the steps until it ends successfully.
You may need to change some owner and permission properties of the new files:
sudo chown -R <username>:www-data /var/www/html/phis-webapp
sudo chmod 775 -R /var/www/html/phis-webapp
You should now have an operationnal OpenSILEX PHIS application on your localhost! Go to http://127.0.0.1:80/phis-webapp and test it by logging in.
If you have any problem, please check the following Common errors section.
In the future, to start OpenSILEX PHIS in Localhost, you’ll only need to run apache-tomcat service. You can also create an alias using this command :
alias phis='apache-tomcat/bin/startup.sh;xdg-open http://localhost/phis-webapp/web'
3. Common errors
Problems with Netbeans
- Exit without error message when starting
Some ressources are not found or accessible.
Check rights on files/folders in ~/.netbeans/8.2.
ls -l ~/.netbeans/8.2
To run Netbeans, the owner of all files/folders should be the your username. You can fix it with:
sudo chown -R <username>:<username> ~/.netbeans
Netbeans need also the user to be able to read and write all the files in the folder:
sudo chmod -R ug+rw ~/.netbeans
- Errors concerned jdk/jre:
Netbeans doesn’t find your JDK installation. To fix it, check if you have indicated the correct JDK folder to Netbeans in the ~/netbeans-8.2/etc/netbeans.conf file (line 57).
If the error persists, your JDK installation may haven’t been done correctly. Uninstall JDK and use this procedure to reinstall.
Issues with Composer
If you have installed Composer with apt from Ubuntu packages, please uninstall Composer (consider deleting the cache and the configuration files in the ~/.cache and /etc folders) and reinstall Composer with this procedure, or the official one : getcomposer.org/download/, using the following install-dir and filename options :
php composer-setup.php --install-dir=bin --filename=composer
If it doesn’t fix the problem, please check the composer troubleshooting page.
Errors with PostgreSQL
- FATAL: authentification peer:
Edit file /etc/postgresql/9.5/main/pg_hba.conf and change the line 90:
local all all peer
by
local all all md5
and restart the service:
sudo systemctl restart postgresql
- Distance connection impossible
Edit the /etc/var/postgresql/9.5/main/pg_hba.conf file.
You need to adapt the values with the correct IP address:
hosts all all <ipaddress> md5
Edit the /etc/var/postgresql/9.5/main/postgresql.conf file and edit the line:
listen_addresses: '*'
and restart the service:
sudo systemctl restart postgresql
Errors with the web service
- Errors with the generation of the WAR file
In Netbeans, right click on the project name -> Resolve problems.
If it detects plugin problems, I recommand you to fix them yourself with the menu : Tools -> Plugins.
If it appears to be another problem, you can try to fix it with the Resolve button.
But if the problem persists, it probably comes from a modification in a project file. You can try to find it, to reopen the project or to remove all the OpenSILEX web service files and reload them).
- No ressources / 404 or other problems with the web service
Recheck paths and ports in the web service file services.properties. If all was done exactly like this:
[...]
logDirectory=/home/tomcat/phis2ws/logs

[...]
host=127.0.0.1:8080
basePath=/phisws/rest
[...]
webAppHost=127.0.0.1
webAppPort=8080
[...]
webAppApiDocsName=phis2ws
[...]
webAppApiBasePath=/phis2ws/resources

[...]
uploadFileServerPort=22
# Adresse de sauvegarde des donn\u00e9es
uploadFileServerIP=127.0.0.1
uploadFileServerUsername=<linux session username>
uploadFileServerPassword=<linux session password>
uploadFileServerDirectory=/home/<user>/phis-ws/documents/instance
uploadImageServerDirectory=/var/www/html/images
layerFileServerDirectory=/var/www/html/layers
layerFileServerAddress=http://127.0.0.1/layers
[...]
- Error with test
brapiv1token
Your database is inaccessible or is wrongly set up.
Check your PostgreSQL server with nmap or any tool for port management.
If PostgreSQL isn’t running, restart the service:
sudo systemctl restart postgresql
If the service is running but you still have an issue, it comes from the configuration files.
Check paths, URLs and ports in the service.properties file and check the URLs, ports and database name in the opensilex_sql_config file.
If all these configuration files are correct, it probably is an error in your database.
Errors with the web application
- No home page
If your web browser can’t access to the home page, it may come from the permissions on the web application files in /var/www/html/phis-webapp. Check the permissions with the ls -l command line and make changes if something is wrong. You must have all files set up as follows:
owner: <username of your session>
group: <www-data or the name of you apache user>
rights: rwxrwxr-x
To set the files up correctly with the right permissions, run the following commends:
sudo chown -R <username>:www-data /var/html/phis-webapp
sudo chmod -R 775 /var/html/phis-webapp
- Cannot log in
It can be
- A problem with the configuration file of the web application (
/var/www/html/phis-webapp/config) - A problem with the configuration file of the web service
- A problem with the PostgreSQL database.
In your configuration files, check the URLs and ports.
With psql, check if your database isn’t malfunctionning.
- GitHub token
If you get an error GitHub API limit (60 calls/hr) is exhausted... during the installation of Composer, you need to connect Github and get a Personal access token (see https://github.com/settings/tokens).
Other problems with the webapp and the web service
In lots of cases, problems come from configuration files. Check every informations in these files.
When you modify a web service configuration file, you have to rebuild and redeploy the WAR file. Consider to remove the old version in the Tomcat webapp folder before copying the new version.